Here is a quick and easy recipe shared with me by a nice lady named Dixie. (Thanks!) She said I could share the recipe... so here it is. She says she uses spelt berries, but you can use any whole grain wheat you might have.
Whole Wheat Blender Pancakes
1 cup wheat kernals
1 cup milk
Blend on high for 3 minutes.
Add: 1/2 cup milk
Blend for about 2 more minutes
Add:
2 eggs
1/2 cup oil
1/4 teaspoon salt
1 Tablespoon baking powder
Blend and cook on your pancake griddle. (Or however you usually make pancakes.)
Enjoy and let me know how you like them!
.jpg)
Tuesday, April 16, 2013
Wednesday, April 10, 2013
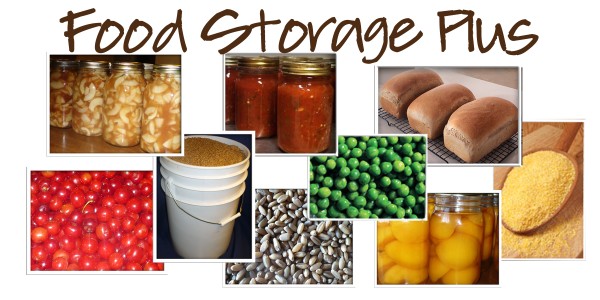
5 Easy Ways to Start Your Food Storage Plan
 |
| photo compliments of Timberline Storage Solutions |
One common question many preppers ask is, “How do I start
a food storage plan?” Well, this is a really good question. There are numerous
ways to start your emergency food supply without starving in the process. With
a little determination and dedication, you can be prepared for any major
disaster or emergency.
5 Simple Ways to Get Your Food Storage Plan Started
The first step is to simply get started. Here are simple
ways to start your food storage today.
1.
Buy in Bulk – If you can afford it,
one of the most cost-efficient ways to build your food storage is by buying
your products in bulk. Buying your foods in larger quantities, such as in
cases, provides you with great savings in the long run. The “per item” prices
are always much cheaper when purchased in bulk.
2.
Add to It Regularly – For preppers
living on a tight budget, it's more affordable to build your supply by adding
to it regularly. Keep a list of the products you already have stored, as well
as those you'd like to add. Each time you go on your regular grocery shopping
trip, add a few of those items and check them off of your list.
3.
Coupons and Deals – Many preppers
start with various products they find on sale. Others look for deals in
newspaper and mail ads, as well as valuable coupons. If you happen to come
across a great deal on a food product you normally eat, buy it and add it to
your storage. In the end, these coupons and deals will help you save a great
deal of money, which you can wisely reinvest in your food storage plan.
4.
Short Term Food Storage – You and
your family can find great comfort in knowing that you have enough food supply
to last you for at least a couple of days. Many short term meal supplies come
in 72-hour, 90-day and 6-month plans. Emergency preparedness experts advise
having enough food to last at least three days in the event of a crisis.
5.
Long Term Food Storage – We all
learned an important lesson after Hurricane Katrina. Many local residents were
without gas, power and water for days, weeks, even months. If a disaster this
deadly ever happens again, those who've prepared with a long-term plan will be
the powerhouses in town. Long-term food storage is also the best route for
emergency preparedness for large families.
Author Bio
This content was prepared by Dirk Puckett. Daily Bread is
an industry leader in long-term
food storage plans. Ready to begin putting your food storage plan together?
Start here and place your order today.
Also check out Timberline Storage Solutions for maintaining your food storage.
Wednesday, May 16, 2012
BUTTER and CHEESE - Make your own!
This is very note-worthy for food storage and being self-sufficient. I just watched a video on MAKING YOUR OWN BUTTER! I knew in my brain that it couldn't be too hard, I just wasn't sure where to begin. The video also touches on making your own (30 minute) mozzarella cheese! I went to a class a few weeks ago on making this same cheese, using a very similar method - and it is good to have a refresher course so I can remember all that I learned.
Here is the link to the video on butter and cheese making!
(NOW I JUST NEED TO BUY A COW OR TWO so I can make my own!)
Here are the instructions to watch this video (since I didn't make it and don't own it...)
Click here:
Basic Living Class - Homemade Butter and Cheese (ID)
Watch video! Enjoy! (btw, the actual video doesn't start until about 3 minutes into it ... so feel free to skip ahead.)
Let me know what you think...
Friday, March 23, 2012
Emergency Preparedness Food Comparison Chart
I had a gentleman send me a link to a new info-graph he made up. I thought it was interesting and thought I'd share.
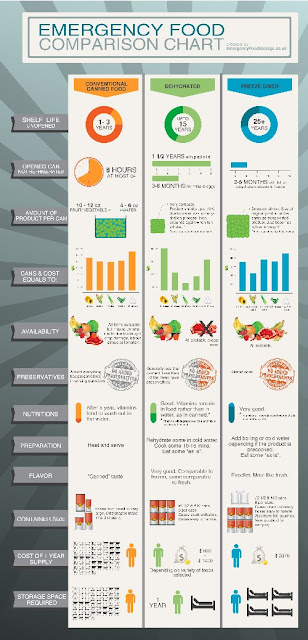
I hope it is big enough for you to make out the wording and all... maybe you can zoom in. (It helped me to read it by putting it in my print preview screen. I didn't actually print it - I just pretended I was going to, but I was able to adjust the image to the size I needed it to read it.)
Anyway, what do you think? is it handy to have all this information in one place?
If you want to learn more about some good emergency preparedness information, you can find their website here: www.emergencyfoodstorage.co.uk
Thanks! Talk to you soon.
Thursday, November 17, 2011
Food Storage: Maintaining a one year supply of long term storage foods
Have you heard you should store a one year supply of foods? It is a good idea. It has been said that the day will come when a bushel of grain will be worth more than gold. (It might be hard to find a lot of nourishment when you are eating that gold!)
 It is wise to have food around and to store it properly.
I've read about and like the recommendation to store things that are easy, simple and have the ability to feed many people - in order to prepare for the worst possible situation. I feel that probably soups and stews are the best solution for longest term storage - and there are so many different variations to them - it doesn't have to be the same old soup every day. Plus, soups only use one pot!
You can put in them anything you grow in a garden, hunt and fish for, or scavenge could potentially all go towards a soup/stew.
You could use and easily store our favorite four main filler items: white rice, dried potatoes (diced or sliced), pasta noodles (macaroni / elbow, spaghetti, any kind of egg noodle), and beans.
For example, the 10 bean mix gives a variety of different nutritional values. You can add dehydtrated veggies (carrots, corn, peas, green beans, onions, etc.) and meat or TVP. The key to this will be your seasonings. You can add bouillons, green or red peppers, slat, white cream sauce, tomato powder or ay other seasoning you have on hand. The more stored, the better when it comes to seasoning soups and stews!
For breakfast, you could use boiling water and adding something to make one pot - like oatmeal, cream of wheat, 6 grain rolled grains, or a 9-grain cracked cereal. You could also store pancake mix to throw in some variety. Don't forget you will need some kind of sweetener such as honey, sugar and powdered milk.
We also suggest fruits, desserts, drink mixes and kitchen aid items, such as baking soda, salt, dehydrated eggs, dehydrated margarine, etc.) Don't forget the basic supply of wheat as well!
I know it is well worth the time and effort to get this done and best of all - find a place to store it!
p..s. If you need some help figuring out a very space efficient way to store your goods, I recommend checking out Timberline Storage Solutions- they just redid my storage area and I LOVE IT!!!!
 It is wise to have food around and to store it properly.
I've read about and like the recommendation to store things that are easy, simple and have the ability to feed many people - in order to prepare for the worst possible situation. I feel that probably soups and stews are the best solution for longest term storage - and there are so many different variations to them - it doesn't have to be the same old soup every day. Plus, soups only use one pot!
You can put in them anything you grow in a garden, hunt and fish for, or scavenge could potentially all go towards a soup/stew.
You could use and easily store our favorite four main filler items: white rice, dried potatoes (diced or sliced), pasta noodles (macaroni / elbow, spaghetti, any kind of egg noodle), and beans.
For example, the 10 bean mix gives a variety of different nutritional values. You can add dehydtrated veggies (carrots, corn, peas, green beans, onions, etc.) and meat or TVP. The key to this will be your seasonings. You can add bouillons, green or red peppers, slat, white cream sauce, tomato powder or ay other seasoning you have on hand. The more stored, the better when it comes to seasoning soups and stews!
For breakfast, you could use boiling water and adding something to make one pot - like oatmeal, cream of wheat, 6 grain rolled grains, or a 9-grain cracked cereal. You could also store pancake mix to throw in some variety. Don't forget you will need some kind of sweetener such as honey, sugar and powdered milk.


We also suggest fruits, desserts, drink mixes and kitchen aid items, such as baking soda, salt, dehydrated eggs, dehydrated margarine, etc.) Don't forget the basic supply of wheat as well!
I know it is well worth the time and effort to get this done and best of all - find a place to store it!
p..s. If you need some help figuring out a very space efficient way to store your goods, I recommend checking out Timberline Storage Solutions- they just redid my storage area and I LOVE IT!!!!
Tuesday, November 15, 2011
Food Storage - How do I Start?
 Food storage is one of the most frustrating things you will do or be involved in. You may wonder where to start, what to store, how much to store, and where to put it? These are only a few of the concerns you may have.
The following suggestions will help to take some of the frustration and confusion away.
Putting your food storage together:
To start, we recommend maintaining a three to six month supply of the foods you are already eating. Later, I'll talk about how to maintain a month or two month supply of ready to eat foods (No water/no cook type, grab and go foods) and a one year supply of long term storage foods – bulk grains, dehydrated or freeze dried foods.
To start: How to store a 3 to 6 month supply of the food you already eat:
I recently went to a food storage class and learned this. It helped simply things for me. So, get lots of scratch paper or your Excel spreadsheet out to figure this out. Make a list of 7 different breakfast menus, 7 different lunch menus, and 7 different dinner menus you eat and love the most (hopefully, for storage sake, they are also fairly simple recipes). For each menu, list all of the ingredients you need for each meal. Once you have done this, simply multiply the number of items per meal you need to last you for either three to six months.
Example:
Breakfast: 2 cups raisin bran, 1 cup milk, 8 oz orange juice, 1 piece toast, 1 tablespoon jelly. This will be eaten once a week, or 4 times a month, or 24 times in 6 months.
So, for 6 month supply, multiply your original meal ingredients by 24. So, I would need to store for one person: 48 cups raisin bran, 24 cups milk, 192 oz (or 1 gallon + 2 Quarts) of orange juice, 24 slices (or 2 loaves) bead, and 24 Tablespoons (or 1 ½ cups) jelly. This will definitely take some math work and a little planning, but once you figure this out, keep all your notes. If you add more people, just add on to the original figures, or remultiply from the original numbers.
Review:
- Figure out each of your menus and write down all ingredients (including water if your recipe needs to be cooked or boiled with water.)
- Multiply out the quantity of ingredients needed. You will need to decide how long you are storing your food and how often you are eating it.
- Multiply each ingredient stored by the number of people you will be providing food for.
- Do this for all seven meals – breakfast, lunch and dinner through the week.
Before you know it, you will have 6 months of food stored for any kind of emergency!
(Please let me know if you need more ideas or suggestions on this.)
p.s. I have more ideas, so I'll get those published in a day or two from now... check back for more!
Wednesday, September 21, 2011
Augason Farms - Part 2: Biscuits
I need to report on the Biscuit Mix that Augason Farms sent me a while ago. I found my pictures, so I am ready to report!
I wanted to make biscuits and gravy. It took me no time at all (hardly) to prepare the "top secret" dough recipe they have printed on the side of the can. You just add water and baking powder to the mix and stir it up. The consistency was easy to get and they rolled out very nicely as you can see here. I even used my best biscuit cutter (a small glass). =)Biscuits
 Here they are - thrown onto a baking sheet.
 My baby was so excited he watched them bake the ENTIRE time they were in the oven!
 Here they are just fresh out of the oven. Aren't they beautiful - and golden brown, no less!
 I didn't fold them over during the dough stage to create an easy open after they were baked, but they still split nicely. The biscuits weren't dry and crumbly, they had a wonderful consistency! And I ate a few by themselves - nothing on them - and the flavor was very good - how a buttermilk biscuit should taste!
 We spiced things up with a little sausage gravy:
 And here is the plate full of food: biscuits and gravy with eggs on the side. It was a wonderful meal!
 Result: Easy to make, tastes great and I will continue to use the biscuit mix from Augason Farms.
I wanted to make biscuits and gravy. It took me no time at all (hardly) to prepare the "top secret" dough recipe they have printed on the side of the can. You just add water and baking powder to the mix and stir it up. The consistency was easy to get and they rolled out very nicely as you can see here. I even used my best biscuit cutter (a small glass). =)Biscuits


Freeze Dried Chicken
I posted a while ago about the Freeze Dried Chicken going into Hawaiian Haystacks. I've done that several times and still love how fast and easy it is! The hardest part is cooking rice and that isn't very hard.
I tried this pizza a little while ago (and just found the pictures again) and thought I'd share with you... since I did this a while ago, my memory is a little sketchy. I remember very well that it tasted good and was a fabulous meal, but I can't remember all my toppings.
I made a chicken pizza. I was running low on other meats, so I decided to try the Augason Farms Freeze Dried Chicken.
First, I rehydrated it: (little chicken, little water, let it soak up the water for at least one minute.)
 Here it is almost soaked up:
 Add chicken to my pizza on top of regular pizza sauce:
 Add other toppings: mushrooms, cheese, bacon bits? I can't remember what else... sorry.
 I obviously tried a piece before I remembered to take a "final" picture. I just remember it was very good. I'll probably do it again!
Result: I'm still impressed with Augason Freeze Dried Chicken Chunks. Check it out!Freeze Dried Chicken
I tried this pizza a little while ago (and just found the pictures again) and thought I'd share with you... since I did this a while ago, my memory is a little sketchy. I remember very well that it tasted good and was a fabulous meal, but I can't remember all my toppings.
I made a chicken pizza. I was running low on other meats, so I decided to try the Augason Farms Freeze Dried Chicken.
First, I rehydrated it: (little chicken, little water, let it soak up the water for at least one minute.)


Result: I'm still impressed with Augason Freeze Dried Chicken Chunks. Check it out!Freeze Dried Chicken
Monday, September 12, 2011
Any Old Bottle of Fruit Cake Recipe
I've been meaning to share this recipe for a while, but never remembered to find it at the same time I wanted to blog. This is a great recipe when your fruit turns a little brown in the bottle and you don't really want to eat it. I still need to make it, but I wanted to post it before it got lost again.
Here goes:
Any Old Bottle of Fruit Cake
Ingredients:
1 quart fruit
2 cups sugar
1 cup oil (or you can use 1/2 cup applesauce and 1/2 cup oil)
4 cups flour
4 teaspoons soda
1 teaspoon salt
1 teaspoon cloves
1 teaspoon nutmeg
1 teaspoon cinnamon
Instructions:
Pour entire bottle of fruit into blender and blend until smooth. Mix all dry ingredients together into a mixer bowl. Add blended fruit and oil to dry mix, mix until fairly smooth. (IMPORTANT NOTE: If you are in a hurry and decide to just add everything to the blender and mix until smooth - this will work most of the time. However, if you are using rhubarb as your bottle of fruit, please note that rhubarb and baking soda do not mix well together, they cause explosions and will create a large mess in your kitchen!)
You may also add 2 cup raisins and/or 1 cup nuts.
Bake in a 9 x 13 (greased) cake pan at 375 for 55-60 minutes.
It is served best with cream cheese frosting or a caramel frosting (see below)! =) Enjoy!
Caramel Frosting:
1/3 cup butter
1/3 cup brown sugar
1/3 cup light cream or milk.
Barely bring mixture to a boil on the stove, then take off heat. Gradually stir in 2 cups of powdered sugar and 1 teaspoon vanilla. (YUMMY!!)
p.s. I've eaten it, but not made it. When I do, I'll be sure to post pictures!!
Tuesday, August 16, 2011
Melons Melons and more Melons
Hey folks we are excited to let you know that we just received another shipment of fabulous tasting watermelon and cantaloupe from Hagerman Idaho!!! If you haven't ever eaten one of these great melons you are definitely missing out. I even have my wife who doesn't normally eat cantaloupes eating them. I can eat a whole one if I'm not careful. So come on by the house and get you one or two, mention the blog and get 30% off a cantaloupe when you buy a watermelon. For those of you in Idaho Falls you can find these tasty melons at Grandpa Johnson's Fruit stand on the west side of the Grand Teton Mall along Chann
ing Road.
We will also be set up in front of the Rexburg Albertson's store doing samplings of our local Idaho grown produce on Friday the 19th (August) from 11 am to 4 pm. We will also be there Saturday from 11 am to 6 pm. We will have our own sweet corn, beets, green beans, new red potatoes, walla walla onions, cabbage, and pickling cukes.
So come on over and say hello and don't forget that we'll still be at the Driggs Market fridays from 9am - 1 pm, The Rexburg FM from 4pm- 8pm, and Sat at Snake River Landing from 9 am to 2pm.
Nathan
Subscribe to:
Posts (Atom)